
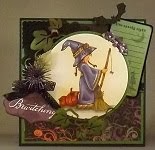
I found a cool display put together last October by Ellen Hutson at the CLASSroom here. Ellen's Hocus Pocus Test Tube Treat Holder makes a nice Halloween display for a smaller tube. Inspired by her spooky tube holder, I began putting together a more dainty version.
I used Grafix Medium Weight Chipboard and had to add 1 1/2" to the top. I held the chipboard pieces together using basic masking tape on both sides. Masking Tape is strong and flexible and can withstand regular handling. I thought it best to make three the first time, you know, just in case I messed up so badly then I'd have another ready to try again - LOL!!!
I used my Zutter Kutter to score through one side of the chipboard piece in several places.
I needed a 1 1/4" circle cut out of the chipboard for the tube to slide through. I don't have any punches that will cut nicely through chipboard. I don't have any single circle die cuts that I could easily fit through my die cut machines. Hmmm. I might have to break a sweat for this project - LOL!!! I had to use the smallest of my Creative Memories circle cutters with the green blade to score through the top layer of the chipboard and finish the circles with an xacto knife. That part was not so much fun but definitely worth it! Here's how my naked chipboard looks now . . .

So far, so good - LOL!!!
I used Ranger's Distress Ink in Worn Lipstick to ink the fold areas and edges on both sides.

That ink coordinates well with My Mind's Eye Market Street "Princess" Princess Crowns and Lovely Lady Paper that I plan to decorate my Display Stand with. I tried to adhere one full sheet then create the folds and found that the paper shifted so I adjusted and used smaller paper pieces to fit just the panels between the folds. Here's how the inside of the Display Stand looks now . . .

I used a pencil to mark the placement of my circle on the wrong side of the patterned paper and cut the circles before adhering those papers. Here's how the outside of the Display Stand is covered . . .

Three small pieces of 1" wonder tape secures the folded bottom to the back for the base. Now my Display Stand for the Tube is ready for embellishing - Woo Hoo!!! This shot of a naked chipboard display stand may help you to see how it's folded and adhered.

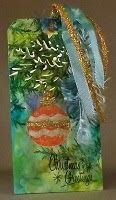
The top ledge has plenty of room to hang things from. I've used Tim Holtz' Baubles with some wire attached to a My Mind's Eye Lost and Found Madison Avenue "Sisters" button. I added a patch of K&Company Smitten Ornaments rub-on lace to the Tube itself.

The folded base of the display stand has plenty of room for embellishments. I used an Autumn Leaves Greetings Rub-on, and white paper blooms that I airbrushed with Copic markers R12, R20, R32 and R37, then painted with Diamond Stickles. Some Fruit Punch Stickles fills the space between the chipboard folds.

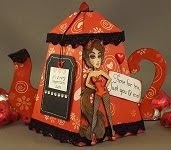
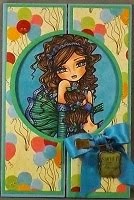
This photo shows the completed Display Stand for The Tube as decorated for a Baby Princess . . .

I'm off to find something wonderful to put inside The Tube . . .
Ooo! Cool! I have two more Display Stands for The Tube ready to be dressed!!!


1 comment:
Sweet! Really great decoration for a tablesetting or as a little gift. Perfect!
Love n hugs
Marie
Post a Comment